You only need seven fly fishing knots to rig your whole setup, from the reel to the fly. Learn these and you’ll tie on flies faster, lose fewer fish, and stop wondering if a knot will hold.
This guide shows how to tie a fly fishing knot at each connection: the arbor knot, Albright knot, nail knot, perfection loop, blood knot, surgeon’s knot and improved clinch knot. For each one you’ll get when to use it and simple steps to tie it.
Where each knot goes:
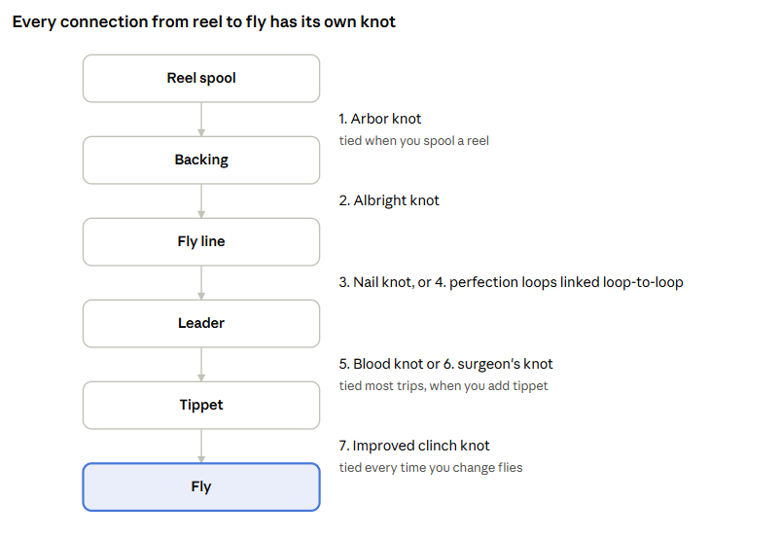
Each connection on a fly rod has a knot built for it. The first three you tie once, when you set up the reel. The last two you tie all day on the water.
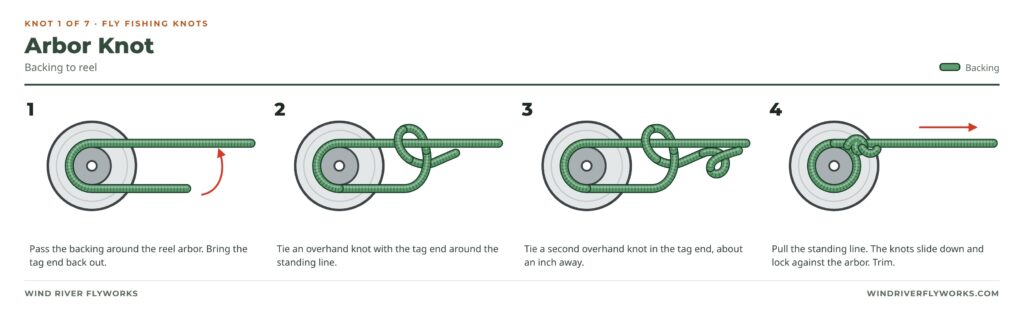
- Arbor knot
Use it for: tying backing to the reel spool. It only has to grip the spool so the line doesn’t spin. If a fish takes you this deep into the backing, you have bigger problems than the knot.
- Pass the backing around the reel’s arbor (the center of the spool).
- Tie an overhand knot with the tag end around the standing line.
- Tie a second overhand knot in the tag end, about an inch from the first.
- Wet it and pull the standing line. The two knots slide down and lock tight against the spool.
- Trim the tag end close.
- Albright knot
Use it for: joining backing to fly line. It also joins two lines of very different thickness, like a heavy shock tippet to a lighter leader. Its slim profile slides through the rod guides without catching.
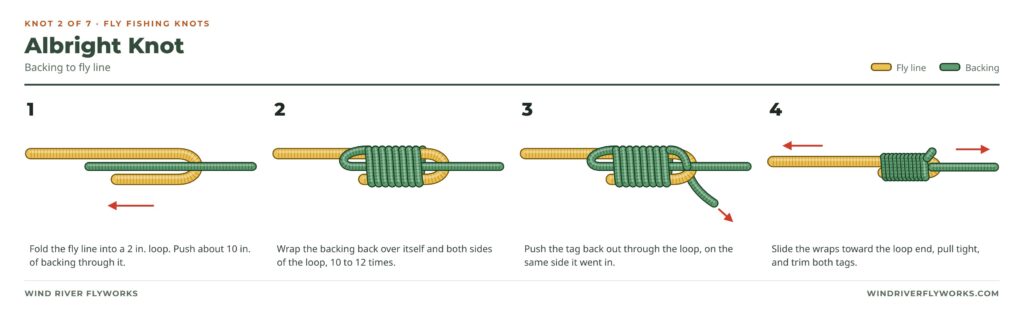
- Fold the end of the fly line back on itself to make a loop about 2 inches long.
- Push about 10 inches of backing through the loop.
- Pinch the loop and backing together. Wrap the backing back over itself and both sides of the loop, 10 to 12 times, working toward the end of the loop.
- Push the tag end of the backing back out through the loop, on the same side it came in.
- Slide the wraps toward the loop end, wet the knot, and pull both ends of the backing tight. Then pull the fly line and backing in opposite directions.
- Trim both tag ends.
- Nail knot
Use it for: attaching the leader (or a short butt section) to the fly line. It’s smooth and strong, and it runs through the guides easily. Many fly lines now come with a welded loop, so you may only need this one when the loop wears out.
The easiest way is with a small hollow tube, like a cocktail straw or a nail knot tool.
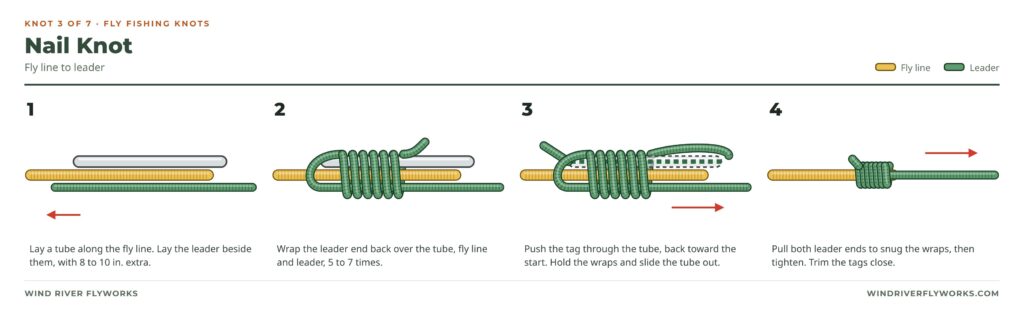
- Lay the tube alongside the end of the fly line.
- Lay the butt end of the leader next to them, pointing the other way, with 8 to 10 inches extra.
- Wrap the leader’s tag end back over the tube, the fly line and the leader itself, 5 to 7 times. Keep the wraps snug and side by side.
- Push the tag end through the tube, back toward where you started.
- Hold the wraps and slide the tube out, so the tag end stays inside the wraps.
- Pull both ends of the leader to snug the wraps. Then wet it and pull tight.
- Trim the fly line and leader tags close.
- Perfection loop
Use it for: making a small, neat loop at the end of a leader or butt section. Two loops link together loop-to-loop, so you can swap leaders in seconds with no new knot. The loop sits straight in line with the leader, so it casts cleanly.
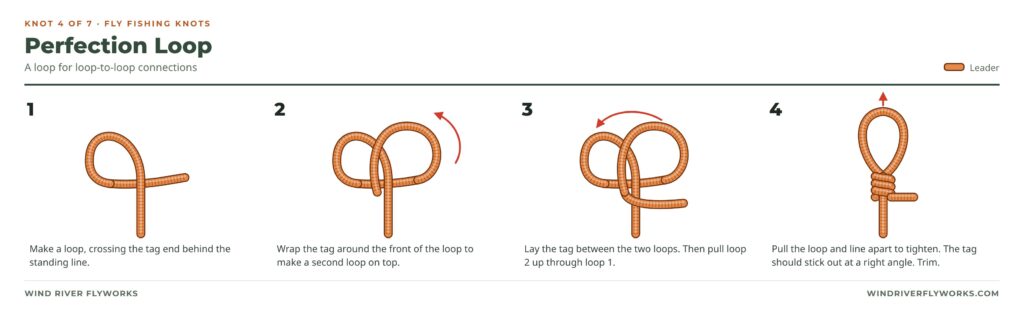
- Make a loop by passing the tag end behind the standing line.
- Wrap the tag end around the front of that loop, making a second, smaller loop on top of the first.
- Lay the tag end between the two loops and pinch it there.
- Reach through the first loop and pull the second loop up through it.
- Wet it and pull the new loop and the standing line in opposite directions until it seats.
- Trim the tag end. If it stands out at a right angle to the line, you tied it right.
Loop-to-loop connection: pass the leader’s loop over the fly line’s loop. Then feed the whole leader through the fly line’s loop and pull. The two loops should lock like a square knot, not fold over each other like a girth hitch.
- Blood knot
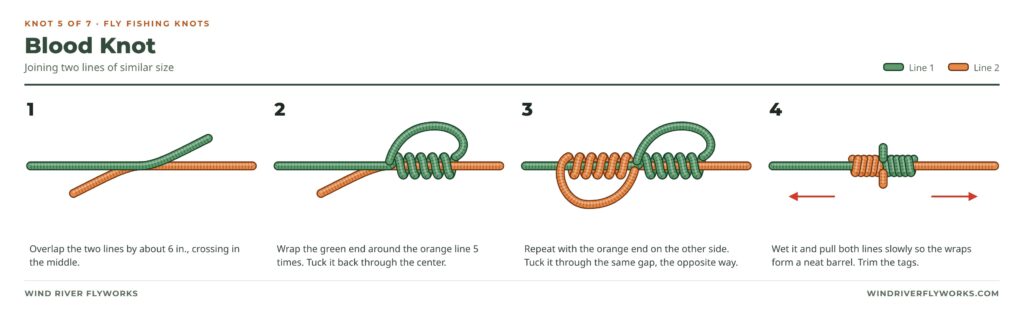
Use it for: joining two pieces of line that are close in size, like 4X tippet to 5X. It makes a slim, straight knot. It’s the classic knot for building a leader by hand. It’s harder to tie than the surgeon’s knot, but it’s neater.
- Overlap the two lines by about 6 inches, pointing in opposite directions.
- Wrap one tag end around the other line 5 times.
- Bring that tag end back to the middle and push it through the gap where the lines cross.
- Wrap the second tag end around the first line 5 times, going the other direction.
- Push the second tag end through the same middle gap, from the opposite side of the first one.
- Wet it and pull both standing lines slowly. The wraps pull together into a neat barrel.
- Trim both tag ends close.
- Surgeon’s knot
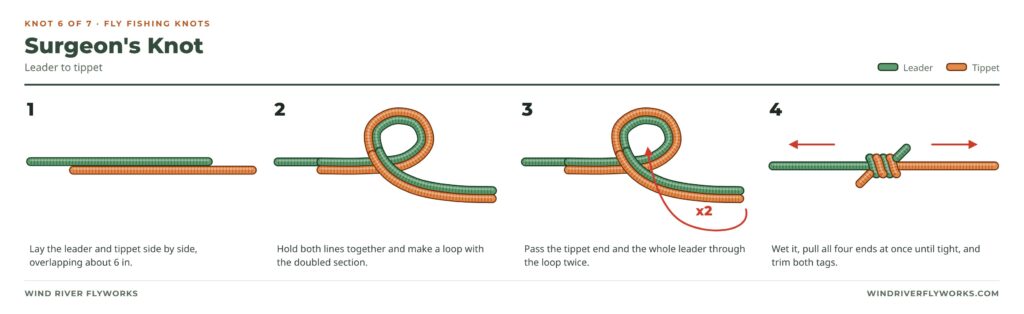
Use it for: adding tippet to your leader on the water, fast. It’s strong, it joins lines of different sizes, and it’s easy with cold fingers. Most anglers use it more than any knot except the clinch knot.
- Overlap the leader and the new tippet by about 6 inches, pointing in opposite directions.
- Hold them together and form a loop with both lines.
- Pass the tippet’s tag end and the whole leader through the loop together.
- Pass them through the loop a second time. That’s a double surgeon’s knot. A third pass makes a triple, which is a bit stronger.
- Wet it and pull all four ends at once until it’s tight.
- Trim both tag ends.
- Improved clinch knot
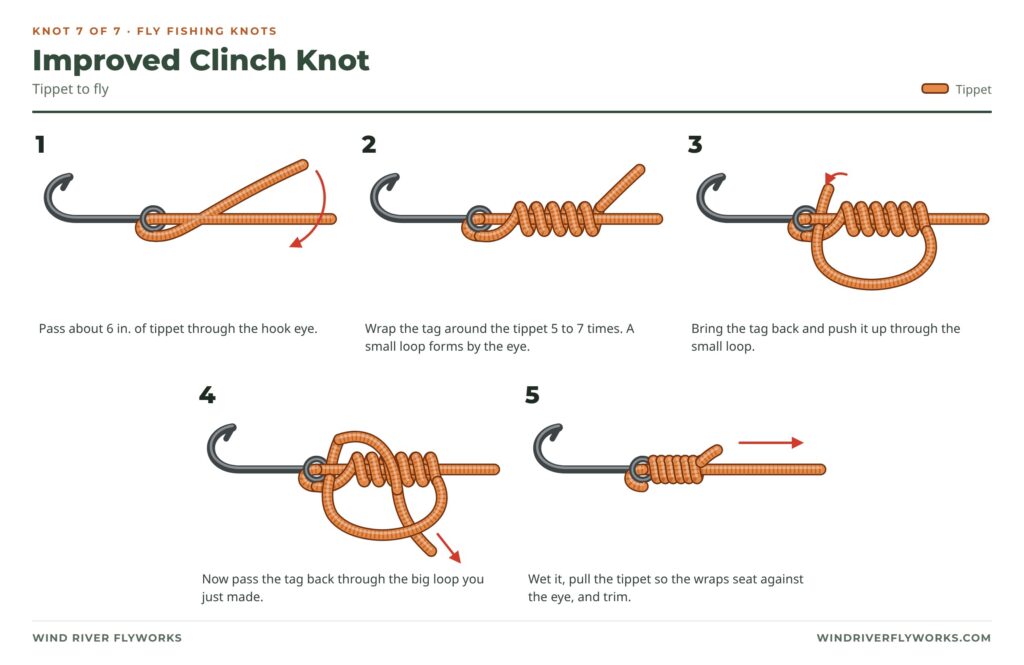
Use it for: tying the fly to your tippet. It’s the knot you’ll tie most, often dozens of times a day. It’s quick, holds well on tippet from 2X down to 7X, and works with almost any fly.
- Pass about 6 inches of tippet through the hook eye.
- Wrap the tag end around the standing line 5 to 7 times. Use more wraps for light tippet and fewer for heavy.
- Push the tag end through the small loop just above the hook eye.
- Now pass the tag end back through the big loop you just made. This step is the “improved” part.
- Wet it and pull the standing line slowly. The wraps coil down against the eye.
- Trim the tag end, leaving a tiny stub.
Quick reference
Knot | Connection | How often you’ll tie it | Difficulty |
Improved clinch | Tippet to fly | Many times every trip | Easy |
Surgeon’s knot | Leader to tippet | Most trips | Easy |
Blood knot | Line to similar-size line | Now and then | Medium |
Perfection loop | Loop in leader or butt section | Now and then | Medium |
Nail knot | Fly line to leader | A few times a year | Medium |
Albright knot | Backing to fly line | When you re-spool | Medium |
Arbor knot | Backing to reel | When you re-spool | Easy |
If you only learn two, learn the improved clinch and the surgeon’s knot. They cover almost every knot you’ll tie on the water.
Tips for strong knots every time
- Always wet the knot before you tighten it. Spit or river water works. Dry line heats up from friction and gets weaker.
- Pull slowly and steadily. A quick jerk can kink or cut the line inside the knot.
- Leave a tiny tag. Trim close, but not flush, so the knot has room to settle.
- Test every knot. Give it a firm tug before you cast. It’s better to find a bad knot now than on a big fish.
- Retie often. Retie after a big fish, after a snag, or when you see a curl or a nick in the tippet.
- Practice at home. Tie each knot ten times at the kitchen table with thick line. Then the river is the easy part.
Tie it on and go fish
With these seven knots you can rig a fly rod from bare spool to fly. You’ll tie most of them only a few times a year. The clinch and surgeon’s knots you’ll tie on every trip, so practice those until you can tie them without looking.
Keep reading
- Fly Fishing Knots and Rigging: how the whole line system fits together, plus four rigs to set up
Shop This Article
Stickers and gear that go with this guide, drawn by Nick and printed in the USA.